The scent of a homemade bread, freshly baked from the oven : it's without a doubt one of the most beautiful smells on my "best ever" list. My mom used to make bread two times a week but, what do you know, we, the children, preferred the store bought bread! She taught me how to make bread very early on. I must have been 9 or 10 when I attempted to make my first bread. And even if I had sworn to always buy bread when I grow up, I started making bread when I had my own children. Not on a regular basis like my mom, but fairly often. Making bread is like completing a sense of being
home for me.
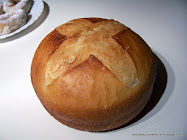
Tonight, about ten minutes ago, I just took my two freshly baked loaves from the oven and I thought that it might be nice to tell you how I make my bread. It's stunningly simple, believe me, you can make it.
What a sight! And what about a warm slice of bread with an indecent amount of butter melting on it? To die for!
So what's all the buzz about the making of bread? Let's get it straight: you can make it in so many different ways and with so many different ingredients, it's mind blowing. But, there are always some basic steps involved that you can master easily. First of all, you have to lose your fear, yes, you heard me right, the fear of making bread. It's such an easy, simple and natural process that you won't believe it. There are only 4 basic ingredients involved:
- Flour (white is the easiest to begin with)
- Yeast (Fleischmann's or any other will do)
- Salt
- Water
That's it, you don't need anything more to make bread! Oh, I forgot: a plastic bowl, your hands, some kind of baking pan and an oven - that should cover it. Start with a basic recipe and then, when you are more confident, start to experiment and add other stuff, you can find so many recipes on the Internet.
I didn't give you the measures for the ingredients because you simply don't need them! I didn't make any photos of the process, sorry, I'll add them next week, when I make some more bread.
You can take approximately 2 cups of flour per person for 1 loaf of bread. Put your flour in a not to small plastic bowl, make a hole in the middle and add 1 teaspoon of dry yeast per 2 cups of flour. Prepare a cup of warm water (lukewarm rather then to hot) and pour it slowly on the yeast mixing it with water and adding a little bit of flour in the process. Take a simple wooden or even metallic spoon for this. Just stir together and let it be imperfect - it doesn't really matter. Let it stand for about ten to fifteen minutes, no need to cover it yet. After ten minutes, you should see the work of the yeast: the mix is starting to rise and to crackle. Now you can add a little bit of salt, say 1 teaspoon per 2 cups of flour, taking care to add it on the flour and not on the yeast preparation. Wash your hands thoroughly and prepare 2 to 4 cups of warm water, depending on the quantity of flour. Start by slowly pouring little bit of water in the middle, on the yeast preparation, with one hand and start to mix it with the rest of the flour in the bowl with the other hand. You need to do it little by little, add water, mix and knead, and so on, till you have an elastic ball of dough and barely flour in the bowl. Continue to play with the dough, to knead it and to fold it in order to make it smooth, about 10 minutes. Form a ball, cover the bowl with a kitchen towel or even with a clean plastic bag and let it rest for about 1 hour. If you have time, you can knead the dough again after the first hour and let it rest for another hour. That allows the yeast to develop even better and to give the bread that famous smell. If not, take your dough out of the bowl and put it on the (very) clean counter or the (very) clean big cutting board dusted with flour. Knead the dough once again and divide it, if needed, in two or more loaves. Form as you like and put it in a baking pan greased with a little bit of butter. Let it stand covered for another hour or till it doubles in volume. Bake it on 400 to 450 degrees Fahrenheit (200 to 225 degrees Celsius) for about 40 to 50 minutes, or until golden brown. Take it from the oven and let it cool on rack. And yes, you can cut a thick slice and eat it with butter right away - you deserve it! If you have any questions don't be shy... Enjoy!


My Homemade Bread


 Posts
Posts