Saturday, January 30, 2010

Heart-Shaped Dessert Recipes For Valentine’s Day

It's that time of year again, everybody is talking flowers, chocolate and love. I must admit I'm not so much into it as I prefer to celebrate love every day of my life with small gestures than to party once a year in this commercial(ized) way. But ok, yeah, I admit it - I kinda love all this red and pink kitsch, can't help it, it's a little girl in me. This year I wanted to make something at home for my Hubby and me so I decided to make a heart-shaped cake or dessert. As I was searching for an easy cheesy recipe I stumbled upon 20 recipes for heart-shaped desserts on Woman's Day Web page. Aren't they just delightful?
  Don't panic right away please! They might seem complicated to make but there is a recipe for every level of cooking expertise. It starts with a 2 minutes Valentine Dessert For Two (can you really make a dessert in 2 minutes?! Incredible!) and it gets  to more complicated and time consuming cakes. There are also incredibly beautiful  No-Bake Mini Heart Cakes. You can find all of the 20 recipes here. I find it more caring and thoughtful to make something for someone you love than just to buy any commercial product. I'd say: go and make some of this beauties and share them with your loved ones!

Share/Save/Bookmark

Thursday, January 28, 2010

Decorating With Pink

What comes first to your mind when you think of decorating with pink? Try this: girly, old-fashioned, country, shabby chic, romance, glamour...I bet you are  already preparing to run in the opposite direction! But hints of pink can be very modern and set  warm and soothing points of interest in your environment. The most important thing is to find a balance and to mix it with other colors such as grey, cream, brown, even white or black. Pink can look good in all rooms - even kitchens and bathrooms - if you don't overdo it. Here are some pictures from my inspiration file:


Share/Save/Bookmark

Tuesday, January 26, 2010

Living as a couple in a foreign country

I just got back from the local radio station where I was invited for an interview. The hostess prepares a mini-series about different aspects of immigrant women's lives in Quebec. She wanted me to talk about what it meant for my couple to live in Quebec in comparison to our country. This was not my first interview on the radio and it wasn't live so I was not so nervous and it all went well. On my way back home I continued to think about other things that I could have said or expressed in a different way. And then I was suddenly overwhelmed by so many memories, so many challenges life gave us, I could have filled hours and days talking about it. Our life was changed drastically several times, we had to flee from danger, learn foreign languages, cultures and customs, change professions, overcome numerous other obstacles. At the same time, we tried to live as normally as possible in order to offer a happy childhood to our children. No, I won't cry, but seriously, i have to fight tears writing this. Yes, it was difficult, but I was more than blessed to have to do it with the man on my side who never stopped holding my hand since we were 19...

And even if so many things changed in our life as a couple, that was the one true thing that remained the same throughout all the experiences. And  for that I'm grateful...
Back to the radio interview: if you are by any chance interested to listen to  this radio program, tune in on radio CKIA on the  February 24, 2010 at 1 pm Eastern Time (USA and Canada). The program is called 'Égalité: genre féminin' and it's in French.

P.S. I love you!


Share/Save/Bookmark

Friday, January 22, 2010

Invisible Organizing

Not only that I'm by no means an organizing guru but I allways struggle to maintain control over different areas of my life. Organizing an apartment or a house might be challenging for some of us but it stays in the domain of manageable. I think. I believe. Whatever.
What causes me trouble is a different kind of organizing that I'm going to call invisible. Why invisible? Well, first of all, you can barely put it in beautiful, color coordinated and labeled boxes. Or so I think. Second, you can't give it to charity when there is too much of it. Third...help!
I have to add to this that I hate numbers,  I'm simply not good at it. That would leave us with everything number related : money, debts, budgets, invoices, mortgage, savings, loans, to name just a few. You should know by now that I'm not in my twenties but boy am I happy to live in the time of the Internet! All the resources and all the smart people who share their knowledge with us!

If you are anything like me, you are grateful for anything  helping you organize (read : not lose control) those areas of your life. Not so long time ago, I stumbled upon a website that offered me great comfort in handling those kind of things and I wanted to share my find with you. It's called Vertex42 and it pretends offering Excel templates, calendars, calculators and spreadsheats. But don't let this explanation fool you for one moment! They offer some serious life and time saving material, I swear. I can't even begin to describe what kind of wonderful tools you can discover on this site! From menu planner to debt reduction calculator and more. I had my own 'dawning' moment when I found the Home Mortgage Calculator and saw with my own eyes what a huge difference a little extra payment can make. Very motivating! And absolutely free! Go see for yourself and explore the endless possibilities - I'm sure you'll find a tool that can help you organize that invisible but so important part of your life. Oh, and just so you know, I'm not in any kind of relationship with this site, they don't even know that I exist.

Share/Save/Bookmark

Tuesday, January 19, 2010

Colorful Interiors Against Winter Blues

Don't know about you, but I desperately need some color as I start to feel a bit sluggish this time of year. Here is a bit of eye candy from Spanish decorating magazine 'Nuevo Estilo':


Here is another one from Home Pic Photo Blog:

The last one is from MadeByGirl:

Don't you feel energized by this striking colors? I could jump for joy! On the other side, I'm convinced that already a little splash of color could do miracles on a winter day. A vase here, a pillow there...go with pink, red, green, yellow...anything will do!

Share/Save/Bookmark

Sunday, January 17, 2010

Homemade Bread - Step by Step

Remember the post from the last week about my homemade bread? I've promised to prepare more photos and more detailed instructions. And as I was about to make my bread again and taking a ton of pictures, I decided to make a step by step illustrated and detailed instructions. Hope it works! If not, I'll have to think of something else...

The whole thing should be clickable like a presentation and you should be able to download it as a PDF file, to print it or to view it on full screen. Let me know what you think about it...

Update1: I think it's working but it's huge! I'm looking for solution...
Update2: I didn't find the way to do it better for the moment. Click on the picture above, I added the link to the file hosted on Scribd and you can do all the above with it...thanks!
Share/Save/Bookmark

Saturday, January 16, 2010

Salvation Art - part two

Today I would like to present the second piece of my "Salvation Art" collection. Click on the link to learn more if you hadn't read my first post about it. This is an original print that I especially love. It hangs in a perfect place, in my bedroom over the bed.

I love everything about it: contrast of black and white, almost dancing movement of two bodies, so close yet so different, the yin and yang feel to it, energic lines, simple frame...

Sorry for the reflection in the picture, I use my old 5 Mpg digital camera since I lost my new one in the unusual way. I guess I'll have to wait with the purchase of another one till I find a new job - but this is a different story. This is a 3/8 print, signed by what appears to be "N. Jager" but I'm not so sure because I haven't found anything on the Internet about an artist with this name.  The best: I paid the incredible price of only 2 $ for it!!! Less than a cup of coffee.

Share/Save/Bookmark

Thursday, January 14, 2010

Recipe for my Homemade Cleaner

Healthy living is one of the major concerns today for everyone and especially for families with little children. All the chemical stuff like additives, pesticides, fertilizers that we consume without even knowing it! It's literally  everywhere: in food, clothes, water, air, paint, cleaning supplies, cosmetic, furniture... Even if you try really hard it's very difficult to avoid it but one can try to change the habits step by step. There is so much useful information today that can be found on the Internet, recipes for homemade everything... That's what I did after being fed up with commercial cleaners. There was always something wrong with them: smell to strong, irritates skin or eyes or nose, to much bleach in it, don't work at all... After a bit of searching I came up with this formula that I love. So I wanted to share today with you the recipe for my homemade all purpose cleaner and another one for "heavy duty" cleaner . It's inexpensive and inoffensive (and it rhymes, lol) and it's made from the ingredients you probably already have at home.

I use the recycled spray bottle for mixing the ingredients directly in it. You need only 4 ingredients:
  • Water - 2  cups
  • White vinegar - 1/4 cup
  • Rubbing alcohol - 1/4 cup
  • Dish soap - a dollop
Start by pouring 1/4 cup of vinegar and 1/4 cup of rubbing alcohol (from 70 to 90%, everything goes) in a clean spray bottle. You can buy a new spray bottle and make your label for it if you are a neat freak. Squeeze in a dollop of dish soap (1 tsp max) and fill the bottle slowly with water until full. Put the spray nozzle on it and close it firmly. Don't shake it yet, turn it slowly (like a lava lamp) to mix all the ingredients, you don't want to make bubbles. That is the basic recipe. You can add other ingredients to it, like eucalyptus or any other essential oil you like, lemon juice,etc. For the dish soap, I prefer to use Palmolive Original.

I love to use this cleaner in my kitchen for every surface, you can even clean glass with it - spotless! I also love to clean my fridge with it in and out, it leaves such a nice smell of cleanliness and it's not at all overpowering like some commercial cleaners. You can use it to clean the bathroom also, but for the bathtub and for the shower I have a recipe for my "heavy duty" cleaner. Very easy to prepare but you have to prepare it each time when you want to clean - or so I do, I imagine that the power of the ingredients combined is at its highest right after mixing. You will need similar ingredients, without water :
  • White vinegar - 1 part
  • Baking soda - 1 part
  • Dish soap - a dollop or two
upload pictures
In a little plastic, metal or glass bowl or even any recycled container, add 1/4 cup of baking soda, add a dollop or two of the dish soap. Add 1/4 cup of white vine vinegar and let it build a foam for 30 seconds or so.    Mix with a sponge and apply immediately on the bathtub or in the shower then rub lightly with a sponge the entire surface to clean. Let sit for 5 to 10 minutes, wash it of and dry the surface with a clean cloth if you wish. If you have mold stains you can add several drops of the Tea tree oil in the mixture, that should help if regularly applied. That's it - nothing complicated, you really should try it.


Share/Save/Bookmark

Tuesday, January 12, 2010

Taking Pictures Inside Stores

First thing first: I did it only once and I felt awful during and after. As if I was a thief... It happened spontaneously, I didn't plan it, I was just looking for some color inspiration for my second bathroom. There were some lovely combinations and since I take my digital camera everywhere with me, I decided to take some pictures instead of writing down  the ideas. Just the fact that I looked around to see if anyone is watching me can  tell you for sure that I knew I wasn't supposed to do it. And, I didn't use flash on my camera either to avoid capturing attention of the sales people. Sneaky little...blogger!  Did you already do it? Do you find it awkward taking pictures inside stores? Tell me about your experience or tell me what you think about it. Anyway, here are some of the pics I took that day:
design Color Inspiration store


Share/Save/Bookmark

Friday, January 8, 2010

Yellow My Love !

I always loved yellow, since I was a little kid. This color cheers me up and makes me happy instantly no matter where I see it. Yellow brings sun and light in your life and home but it also attracts regards wherever you put it. Warning: this color isn't for the Faint of Heart, you must be a very special person to love it and use it. There you go blue-lovers !


For more inspiration in yellow you can visit my album 'Yellow My Love'

Share/Save/Bookmark

Monday, January 4, 2010

My Homemade Bread

The scent of a homemade bread, freshly baked from the oven : it's without a doubt one of the most beautiful smells on my "best ever" list. My mom used to make bread two times a week but, what do you know, we, the children, preferred the store bought bread! She taught me how to make bread very early on. I must have been 9 or 10 when I attempted to make my first bread. And even if I had sworn to always buy bread when I grow up, I started making bread when I had my own children. Not on a regular basis like my mom, but fairly often. Making bread is like completing a sense of being home for me.

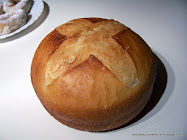
Tonight, about ten minutes ago, I just took my two freshly baked loaves from the oven  and I thought that it might be nice to tell you how I make my bread. It's stunningly simple, believe me, you can make it.

What a sight! And what about a warm slice of bread with an indecent amount of butter melting on it? To die for!


So what's all the buzz about the making of bread? Let's get it straight: you can make it in so many different ways and with so many different ingredients, it's mind blowing. But, there are always some basic steps involved that you can master easily. First of all, you have to lose your fear, yes, you heard me right, the fear of making bread. It's such an easy, simple and natural process that you won't believe it. There are only 4 basic ingredients involved:

  • Flour (white is the easiest to begin with)
  • Yeast (Fleischmann's or any other will do)
  • Salt
  • Water

That's it, you don't need anything more to make bread! Oh, I forgot: a plastic bowl, your hands,  some kind of baking pan and an oven - that should cover it. Start with a basic recipe and then, when you are more confident, start to experiment and add other stuff, you can find so many recipes on the Internet.
I didn't give you the measures  for the ingredients because you simply don't need them! I didn't make any photos of the process, sorry, I'll add them next week, when I make some more bread.
You can take approximately 2 cups of flour per person for 1 loaf of bread. Put your flour in a not to small plastic bowl, make a hole in the middle and add 1 teaspoon of dry yeast per 2 cups of flour. Prepare a cup of warm water (lukewarm rather then to hot) and pour it slowly on the yeast mixing it with water and adding a little bit of flour in the process. Take a simple wooden or even metallic spoon for this.  Just stir together and let it be imperfect - it doesn't really matter. Let it stand for about ten to fifteen minutes, no need to cover it yet. After ten minutes, you should see the work of the yeast: the mix is starting to rise and to crackle. Now you can add a little bit of salt, say 1 teaspoon per 2 cups of flour, taking care to add it on the flour and not on the yeast preparation. Wash your hands thoroughly and prepare 2 to 4 cups of warm water, depending on the quantity of flour. Start by slowly pouring little bit of water in the middle, on the yeast preparation, with one hand and start to mix it with the rest of the flour in the bowl with the other hand. You need to do it little by little, add water, mix and knead, and so on, till you have an elastic ball of dough and barely flour in the bowl. Continue to play with the dough, to knead it and to fold it in order to make it smooth, about 10 minutes. Form a ball, cover the bowl with a kitchen towel or even with a clean plastic bag and let it rest for about 1 hour. If you have time, you can knead the dough again after the first hour and let it rest for another hour. That allows the yeast to develop even better and to give the bread that famous smell. If not, take your dough out of the bowl and put it on the (very) clean counter or the (very) clean big cutting board dusted with flour. Knead the dough once again and divide it, if needed, in two or more loaves. Form as you like and put it in a baking pan greased with a little bit of butter. Let it stand covered for another hour or till it doubles in volume. Bake it on 400 to 450 degrees Fahrenheit (200 to 225 degrees Celsius) for about 40 to 50 minutes, or until golden brown. Take it from the oven and let it cool on rack. And yes, you can cut a thick slice and eat it with butter right away - you deserve it! If you have any questions don't be shy... Enjoy!


Share/Save/Bookmark
Related Posts Plugin for WordPress, Blogger...