Showing posts with label recipe. Show all posts

Saturday, July 16, 2011

Fruity Summer Cake Recipes

I was just searching for the recipe to use the raspberries I have when I stumbled upon Sweet Paul's digital magazine. What a delight! This summer issue is full of delicious treats, lovely DIY ideas with instructions and everything is so beautifully photographed too.
If you are not familiar with Paul Lowe's work (I sure wasn't), he is a New York based food and interior stylist whose very successful blog is also worth bookmarking. Get your dose of summer by flipping through the gorgeous summer issue of  Sweet Paul Magazine!
I'm off to make those divine raspberry tarts with mascarpone cream filling. Enjoy your weekend!

P.S. Some more summer delights for you to make : 50 Best Summer Cake Recipes


Share/Save/Bookmark

Saturday, February 12, 2011

Quick & Simple Heart-Shaped Dessert Recipe For Valentine’s Day

Scratching your head in search of last minute idea for something simple and very quick to make for your loved ones? Me too! So it happened that I remembered a simple recipe for a very versatile dough I used to make long time ago. Added an apple, some brown sugar and cinnamon and here is the result:
I think it looks lovely and certainly handmade but it took me less than 1 hour, with baking time, to finish it. As for the dough recipe, you'll need the same amount in weight of cottage cheese, margarine and flour. Nothing else, no eggs, no salt, no sugar...
I made the dough with 250 g of each. If your cottage cheese is to grainy you'll need to make it smoother with a hand blender or in the food processor. Add the margarine and mix well - mixing thoroughly with a fork is OK. Add the flour and continue to blend the ingredients with a fork or with the wooden spoon. If your dough feels to wet add a bit of flour.
Roll  the dough out  on the floured surface approximately 0,5 cm thick (1/5 of an inch), cut the hearths with a cookie cutter and place them on the baking sheet. Sprinkle each heart with some brown sugar and cinnamon if you like. Cut a small apple into thin slices and place 2 of them on each heart. Bake them in the oven on 380° F/180° C for 25-30 minutes. I wanted to color some apple slices in red but didn't have any red  food coloring left so I mixed some strawberry jelly powder with water and brushed the apple slices. Let them cool a bit and dust with icing sugar. If you want to make something more fancy here is my Valentine's blog post from last year. Bon appetit!

Share/Save/Bookmark

Thursday, February 18, 2010

Back to Comfort Food

It was an incredibly beautiful sunny day today in Quebec. We've been in Canada for almost twelve years now and we never ever had such a nice winter. As we took a walk  today on Plaines d'Abraham, snow was melting and water was running downhill... Normally, in February we would have one snow storm after another, temperatures between -30 and -40 grade Celzius, the hardest part of  the winter. I'm so grateful for this winter. But it's still winter, right? And you newer know when it's going to turn ugly so you must be prepared. One of my favorite weapons against harsh winter is comfort food. I'm not going to start to elaborate on this as I believe that everyone  knows what a bowl of homemade soup can do for the poor winter plagued soul, right? I have a long list of comfort food worthy meals but I make very often one simple thing I've learned from my mother. Remember my first and my second post on my homemade bread? It's my mother who taught me how to make bread and how to make this little sweet "by-product" from the bread dough. Very simple and very yummy!
 All you need is a bit of  a bread dough, oil, icing sugar and vanilla sugar. You can also eat them with sour cream or other things you like if you don't like or don't eat sugar Watch the pictures bellow for instructions and if you have questions don't be shy. Bon appetit!
 
 
Go ahead, make them, you'll become an addict!

Share/Save/Bookmark

Monday, February 1, 2010

Wonderful Cinnamon Swirl Cake Recipe

Can you believe it's February already? Well I can because I had today my first exam in a series of eight. It went smoothly, it wasn't to difficult and I think I did more than ok. We'll see soon...more about it later.
We finally have back our winter temperatures in Quebec - minus 30 or so (me jumping for joy). Today I want to share with you a recipe that I've made a dozen times lately and it always turns out very yummy...
I found the recipe on the Web, it was published in the Craft magazine, volume 10, by Élena Nazzaro, aka frenchtoastgirl.com. Click on the recipe to see the details. The only change I make every time is that I add 3/4 cup of milk to make it fluffier. It really is worth a try, bon appetit!

p.s. Don't forget to prepare a cup of coffee or hot chocolate while baking the cake!

Share/Save/Bookmark

Saturday, January 30, 2010

Heart-Shaped Dessert Recipes For Valentine’s Day

It's that time of year again, everybody is talking flowers, chocolate and love. I must admit I'm not so much into it as I prefer to celebrate love every day of my life with small gestures than to party once a year in this commercial(ized) way. But ok, yeah, I admit it - I kinda love all this red and pink kitsch, can't help it, it's a little girl in me. This year I wanted to make something at home for my Hubby and me so I decided to make a heart-shaped cake or dessert. As I was searching for an easy cheesy recipe I stumbled upon 20 recipes for heart-shaped desserts on Woman's Day Web page. Aren't they just delightful?
  Don't panic right away please! They might seem complicated to make but there is a recipe for every level of cooking expertise. It starts with a 2 minutes Valentine Dessert For Two (can you really make a dessert in 2 minutes?! Incredible!) and it gets  to more complicated and time consuming cakes. There are also incredibly beautiful  No-Bake Mini Heart Cakes. You can find all of the 20 recipes here. I find it more caring and thoughtful to make something for someone you love than just to buy any commercial product. I'd say: go and make some of this beauties and share them with your loved ones!

Share/Save/Bookmark

Sunday, January 17, 2010

Homemade Bread - Step by Step

Remember the post from the last week about my homemade bread? I've promised to prepare more photos and more detailed instructions. And as I was about to make my bread again and taking a ton of pictures, I decided to make a step by step illustrated and detailed instructions. Hope it works! If not, I'll have to think of something else...

The whole thing should be clickable like a presentation and you should be able to download it as a PDF file, to print it or to view it on full screen. Let me know what you think about it...

Update1: I think it's working but it's huge! I'm looking for solution...
Update2: I didn't find the way to do it better for the moment. Click on the picture above, I added the link to the file hosted on Scribd and you can do all the above with it...thanks!
Share/Save/Bookmark

Monday, January 4, 2010

My Homemade Bread

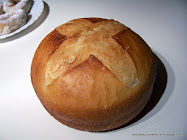
The scent of a homemade bread, freshly baked from the oven : it's without a doubt one of the most beautiful smells on my "best ever" list. My mom used to make bread two times a week but, what do you know, we, the children, preferred the store bought bread! She taught me how to make bread very early on. I must have been 9 or 10 when I attempted to make my first bread. And even if I had sworn to always buy bread when I grow up, I started making bread when I had my own children. Not on a regular basis like my mom, but fairly often. Making bread is like completing a sense of being home for me.

Tonight, about ten minutes ago, I just took my two freshly baked loaves from the oven  and I thought that it might be nice to tell you how I make my bread. It's stunningly simple, believe me, you can make it.

What a sight! And what about a warm slice of bread with an indecent amount of butter melting on it? To die for!


So what's all the buzz about the making of bread? Let's get it straight: you can make it in so many different ways and with so many different ingredients, it's mind blowing. But, there are always some basic steps involved that you can master easily. First of all, you have to lose your fear, yes, you heard me right, the fear of making bread. It's such an easy, simple and natural process that you won't believe it. There are only 4 basic ingredients involved:

  • Flour (white is the easiest to begin with)
  • Yeast (Fleischmann's or any other will do)
  • Salt
  • Water

That's it, you don't need anything more to make bread! Oh, I forgot: a plastic bowl, your hands,  some kind of baking pan and an oven - that should cover it. Start with a basic recipe and then, when you are more confident, start to experiment and add other stuff, you can find so many recipes on the Internet.
I didn't give you the measures  for the ingredients because you simply don't need them! I didn't make any photos of the process, sorry, I'll add them next week, when I make some more bread.
You can take approximately 2 cups of flour per person for 1 loaf of bread. Put your flour in a not to small plastic bowl, make a hole in the middle and add 1 teaspoon of dry yeast per 2 cups of flour. Prepare a cup of warm water (lukewarm rather then to hot) and pour it slowly on the yeast mixing it with water and adding a little bit of flour in the process. Take a simple wooden or even metallic spoon for this.  Just stir together and let it be imperfect - it doesn't really matter. Let it stand for about ten to fifteen minutes, no need to cover it yet. After ten minutes, you should see the work of the yeast: the mix is starting to rise and to crackle. Now you can add a little bit of salt, say 1 teaspoon per 2 cups of flour, taking care to add it on the flour and not on the yeast preparation. Wash your hands thoroughly and prepare 2 to 4 cups of warm water, depending on the quantity of flour. Start by slowly pouring little bit of water in the middle, on the yeast preparation, with one hand and start to mix it with the rest of the flour in the bowl with the other hand. You need to do it little by little, add water, mix and knead, and so on, till you have an elastic ball of dough and barely flour in the bowl. Continue to play with the dough, to knead it and to fold it in order to make it smooth, about 10 minutes. Form a ball, cover the bowl with a kitchen towel or even with a clean plastic bag and let it rest for about 1 hour. If you have time, you can knead the dough again after the first hour and let it rest for another hour. That allows the yeast to develop even better and to give the bread that famous smell. If not, take your dough out of the bowl and put it on the (very) clean counter or the (very) clean big cutting board dusted with flour. Knead the dough once again and divide it, if needed, in two or more loaves. Form as you like and put it in a baking pan greased with a little bit of butter. Let it stand covered for another hour or till it doubles in volume. Bake it on 400 to 450 degrees Fahrenheit (200 to 225 degrees Celsius) for about 40 to 50 minutes, or until golden brown. Take it from the oven and let it cool on rack. And yes, you can cut a thick slice and eat it with butter right away - you deserve it! If you have any questions don't be shy... Enjoy!




Share/Save/Bookmark

Thursday, November 12, 2009

On a secret baking mission

Shhht! Let me close the door first, you never know who's listening...
So, now we are alone and I can tell you my little secret: since yesterday, I am on a secret mission in order to win a cooking / baking contest. I'm preparing a cake that is going to sweep the jury of their feet (what? one is allowed to dream!). The cake is finaly ready now, I took a picture of it this morning and now I only have to write the recipe.

The jury of chefs has to choose 10 recipes to publish on the website and only then it's going to be possible to vote for my (secret) cake. BTW, I have to tell you, I was painfully remainded of one of the Murphy's low yesterday evening as I was about to bake my cake: Anything that can go wrong will go wrong. Not that I'm not familiar with it already, oh no, my friends! In my life, I had a more then fair share of it. But I was a bit saddened that it had to prove me wrong at such an important moment. In fact the first prize is so important that it would allow me to renovate my small, ugly kitchen. It would still have to be on the budget, but I can be very humble, believe me. Anyway, I finally  assembled and decorated the cake to my satisfaction as of this morning. I have to send my recipe along with the picture till midnight today, 12th November. Now let's hope Mr. Murphy is busy with someone else till then...

Share/Save/Bookmark

Monday, November 9, 2009

Indian Carrot-Ginger Soup Recipe

I promised you yesterday the recipe for my favorite Indian Carrot-Ginger Soup. I got this recipe from a German vegetarian cookbook 'Schlemmen ohne Reue' (Indulge without regrets). You can buy it at Amazon but it happens to be on eBay just at this time for only 5 Euro, go for it if you understand German language, it's an excellent book with plenty of colorful, tasty and healthy recipes.


 I modified this recipe slightly in order to keep it simple. So here it goes:
Indian Carrot Ginger Soup
Ingredients:
  • 2 tbsp olive oil
  • 1 large onion, finely chopped
  • 2 garlic cloves, finely chopped
  • 1/2 tsp grated fresh ginger
  • 1/2 tsp ground cumin
  • 1/2 tsp ground coriander
  • 1/2 tsp curcuma
  • 1/8 tsp chili pepper
  • 1/8 tsp freshly ground nutmeg
  • 1 lb carrots, chopped in thick slices
  • 5 cups vegetable broth
  • 1/2 tsp grated lemon zest
  • 1/2 cup yogurt (or 1/4 yogurt + 1/4 sour cream)
  • Salt
  • Pepper
Optional: Freshly chopped coriander leaves and sour cream for garnish
Preparation:
  • Heat oil in a large saucepan over medium heat. Add garlic and onion and stir often until soft, about 5 min. Meanwhile, peel carrots and slice them into 3/4-inch- (2 cm) thick rounds. Grate ginger in a separate little bowl, add all the spices. Add ginger with spices to onion mixture and stir again to warm the spices trough. Add carrots, vegetable broth and lemon zest. Bring to a boil, cover and reduce heat to medium-low. Let simmer for 20 minutes, stirring occasionally, until vegetables are tender.
  • Add yogurt and puree the soup with a hand blender, scraping down inside of bowl as needed. At this point, don't let the soup boil, let it simmer at low heat, add pepper and salt. I usually cut some coriander leaves with scissors and add to the soup, not too much, you don't want to overpower beautiful spices. The soup is ready to serve, you can swirl a little sour cream on top and add a coriander leaf, if you like.
This soup will keep well, covered and refrigerated, at least 5 days or freeze up to 1 month.
You got to admit that a colorful bowl of silky-smooth velvety carrot soup sets the mood for a nice autumn or winter dinner. Enjoy!
Share/Save/Bookmark
Related Posts Plugin for WordPress, Blogger...