Showing posts with label the kitchn. Show all posts

Thursday, February 18, 2010

Back to Comfort Food

It was an incredibly beautiful sunny day today in Quebec. We've been in Canada for almost twelve years now and we never ever had such a nice winter. As we took a walk  today on Plaines d'Abraham, snow was melting and water was running downhill... Normally, in February we would have one snow storm after another, temperatures between -30 and -40 grade Celzius, the hardest part of  the winter. I'm so grateful for this winter. But it's still winter, right? And you newer know when it's going to turn ugly so you must be prepared. One of my favorite weapons against harsh winter is comfort food. I'm not going to start to elaborate on this as I believe that everyone  knows what a bowl of homemade soup can do for the poor winter plagued soul, right? I have a long list of comfort food worthy meals but I make very often one simple thing I've learned from my mother. Remember my first and my second post on my homemade bread? It's my mother who taught me how to make bread and how to make this little sweet "by-product" from the bread dough. Very simple and very yummy!
 All you need is a bit of  a bread dough, oil, icing sugar and vanilla sugar. You can also eat them with sour cream or other things you like if you don't like or don't eat sugar Watch the pictures bellow for instructions and if you have questions don't be shy. Bon appetit!
 
 
Go ahead, make them, you'll become an addict!

Share/Save/Bookmark

Thursday, January 14, 2010

Recipe for my Homemade Cleaner

Healthy living is one of the major concerns today for everyone and especially for families with little children. All the chemical stuff like additives, pesticides, fertilizers that we consume without even knowing it! It's literally  everywhere: in food, clothes, water, air, paint, cleaning supplies, cosmetic, furniture... Even if you try really hard it's very difficult to avoid it but one can try to change the habits step by step. There is so much useful information today that can be found on the Internet, recipes for homemade everything... That's what I did after being fed up with commercial cleaners. There was always something wrong with them: smell to strong, irritates skin or eyes or nose, to much bleach in it, don't work at all... After a bit of searching I came up with this formula that I love. So I wanted to share today with you the recipe for my homemade all purpose cleaner and another one for "heavy duty" cleaner . It's inexpensive and inoffensive (and it rhymes, lol) and it's made from the ingredients you probably already have at home.

I use the recycled spray bottle for mixing the ingredients directly in it. You need only 4 ingredients:
  • Water - 2  cups
  • White vinegar - 1/4 cup
  • Rubbing alcohol - 1/4 cup
  • Dish soap - a dollop
Start by pouring 1/4 cup of vinegar and 1/4 cup of rubbing alcohol (from 70 to 90%, everything goes) in a clean spray bottle. You can buy a new spray bottle and make your label for it if you are a neat freak. Squeeze in a dollop of dish soap (1 tsp max) and fill the bottle slowly with water until full. Put the spray nozzle on it and close it firmly. Don't shake it yet, turn it slowly (like a lava lamp) to mix all the ingredients, you don't want to make bubbles. That is the basic recipe. You can add other ingredients to it, like eucalyptus or any other essential oil you like, lemon juice,etc. For the dish soap, I prefer to use Palmolive Original.

I love to use this cleaner in my kitchen for every surface, you can even clean glass with it - spotless! I also love to clean my fridge with it in and out, it leaves such a nice smell of cleanliness and it's not at all overpowering like some commercial cleaners. You can use it to clean the bathroom also, but for the bathtub and for the shower I have a recipe for my "heavy duty" cleaner. Very easy to prepare but you have to prepare it each time when you want to clean - or so I do, I imagine that the power of the ingredients combined is at its highest right after mixing. You will need similar ingredients, without water :
  • White vinegar - 1 part
  • Baking soda - 1 part
  • Dish soap - a dollop or two
upload pictures
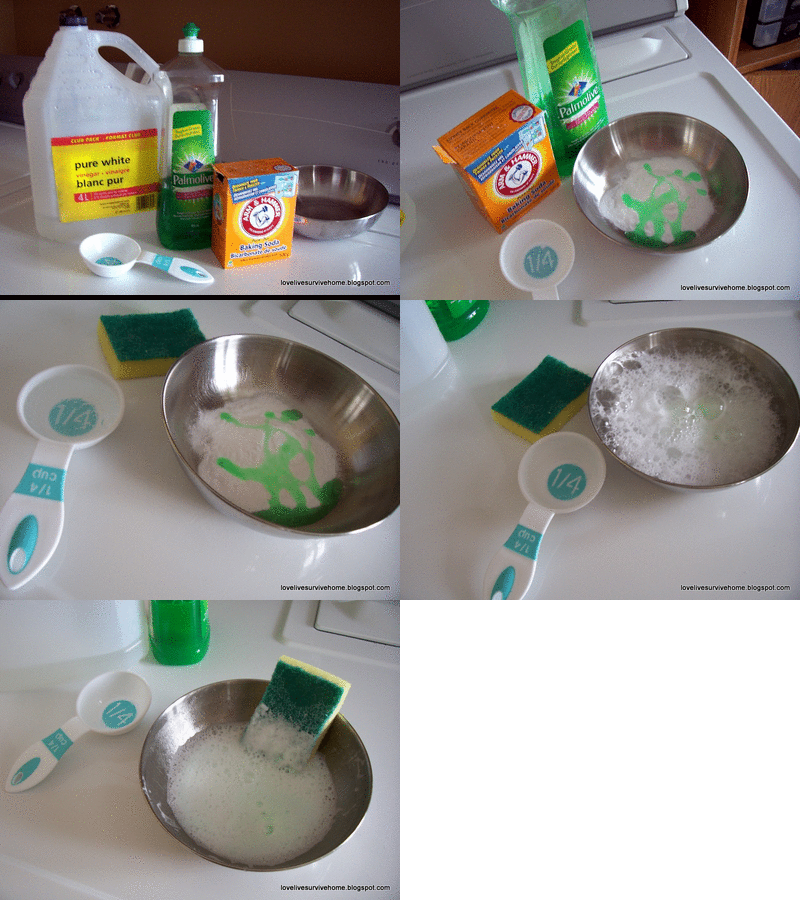
In a little plastic, metal or glass bowl or even any recycled container, add 1/4 cup of baking soda, add a dollop or two of the dish soap. Add 1/4 cup of white vine vinegar and let it build a foam for 30 seconds or so.    Mix with a sponge and apply immediately on the bathtub or in the shower then rub lightly with a sponge the entire surface to clean. Let sit for 5 to 10 minutes, wash it of and dry the surface with a clean cloth if you wish. If you have mold stains you can add several drops of the Tea tree oil in the mixture, that should help if regularly applied. That's it - nothing complicated, you really should try it.


Share/Save/Bookmark

Monday, January 4, 2010

My Homemade Bread

The scent of a homemade bread, freshly baked from the oven : it's without a doubt one of the most beautiful smells on my "best ever" list. My mom used to make bread two times a week but, what do you know, we, the children, preferred the store bought bread! She taught me how to make bread very early on. I must have been 9 or 10 when I attempted to make my first bread. And even if I had sworn to always buy bread when I grow up, I started making bread when I had my own children. Not on a regular basis like my mom, but fairly often. Making bread is like completing a sense of being home for me.

Tonight, about ten minutes ago, I just took my two freshly baked loaves from the oven  and I thought that it might be nice to tell you how I make my bread. It's stunningly simple, believe me, you can make it.

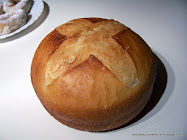
What a sight! And what about a warm slice of bread with an indecent amount of butter melting on it? To die for!


So what's all the buzz about the making of bread? Let's get it straight: you can make it in so many different ways and with so many different ingredients, it's mind blowing. But, there are always some basic steps involved that you can master easily. First of all, you have to lose your fear, yes, you heard me right, the fear of making bread. It's such an easy, simple and natural process that you won't believe it. There are only 4 basic ingredients involved:

  • Flour (white is the easiest to begin with)
  • Yeast (Fleischmann's or any other will do)
  • Salt
  • Water

That's it, you don't need anything more to make bread! Oh, I forgot: a plastic bowl, your hands,  some kind of baking pan and an oven - that should cover it. Start with a basic recipe and then, when you are more confident, start to experiment and add other stuff, you can find so many recipes on the Internet.
I didn't give you the measures  for the ingredients because you simply don't need them! I didn't make any photos of the process, sorry, I'll add them next week, when I make some more bread.
You can take approximately 2 cups of flour per person for 1 loaf of bread. Put your flour in a not to small plastic bowl, make a hole in the middle and add 1 teaspoon of dry yeast per 2 cups of flour. Prepare a cup of warm water (lukewarm rather then to hot) and pour it slowly on the yeast mixing it with water and adding a little bit of flour in the process. Take a simple wooden or even metallic spoon for this.  Just stir together and let it be imperfect - it doesn't really matter. Let it stand for about ten to fifteen minutes, no need to cover it yet. After ten minutes, you should see the work of the yeast: the mix is starting to rise and to crackle. Now you can add a little bit of salt, say 1 teaspoon per 2 cups of flour, taking care to add it on the flour and not on the yeast preparation. Wash your hands thoroughly and prepare 2 to 4 cups of warm water, depending on the quantity of flour. Start by slowly pouring little bit of water in the middle, on the yeast preparation, with one hand and start to mix it with the rest of the flour in the bowl with the other hand. You need to do it little by little, add water, mix and knead, and so on, till you have an elastic ball of dough and barely flour in the bowl. Continue to play with the dough, to knead it and to fold it in order to make it smooth, about 10 minutes. Form a ball, cover the bowl with a kitchen towel or even with a clean plastic bag and let it rest for about 1 hour. If you have time, you can knead the dough again after the first hour and let it rest for another hour. That allows the yeast to develop even better and to give the bread that famous smell. If not, take your dough out of the bowl and put it on the (very) clean counter or the (very) clean big cutting board dusted with flour. Knead the dough once again and divide it, if needed, in two or more loaves. Form as you like and put it in a baking pan greased with a little bit of butter. Let it stand covered for another hour or till it doubles in volume. Bake it on 400 to 450 degrees Fahrenheit (200 to 225 degrees Celsius) for about 40 to 50 minutes, or until golden brown. Take it from the oven and let it cool on rack. And yes, you can cut a thick slice and eat it with butter right away - you deserve it! If you have any questions don't be shy... Enjoy!




Share/Save/Bookmark

Friday, November 13, 2009

Murphy's law it is!

I'm still shaking, since yesterday evening... Remember my secret baking mission? And Murphy's law that I mentioned? Well, I shouldn't have! Cause everything went wrong. I think this mysterious mister Murphy decided to take up a challenge and to spend the evening with me just to see if he's able to do something mentionable. Well, he was. Yesterday afternoon, I spent quite some time writing the recipe down for the contest I was to enter. It had to be in French, the contest is taking place in Quebec/Canada. So I wanted to be sure to use all the appropriate words and to write clear instructions. Finally, towards 6 pm, i finished writing  my recipe and frankly, I was a bit exhausted. So I decided I was going to rest a bit with a cup of coffee before sending my recipe along with the photo via the web site form. What’s the rush, I had 6 hours before the closing of the contest. And I was pretty proud of myself and of my creation for this contest, that I so pretentiously named 'Choco Abricot Volcano':
cake choco chocolate abricot apricot volcano
Now tell me honestly, wouldn't you be proud and excited about it? I certainly was. It was arround 8h30 when I decided that it was time to take action toward winning the first prize. So I opened the webpage of the context and pushed the button that should open the inscription form. The page opened quite rapidly, but in place of  the inscription form a message of error was displayed. Can happen, nothing there... So I refreshed the page with a strange feeling in my gut. It didn't work again. That was only the beginning of the horrible evening that ended after midnight. I tried everything and with every browser possible - nada! Arround 11 o'clock I started to panic realising that Mr. Murphy was comfortably installed on my shoulder and I was only amusing him with my stubbornness. Than I taught of something: I saw the 'Contact us' link and I sent the message explaining the situation. Nothing happened, no one was there.

Shortly before midnight, I decided to take action and opened the 'Contact us' section again, I explained the situation and asked them to consider my application then I pasted the text of my recipe in the box and added the link to the picture of the cake in my Picassa web album and I sent it. At this point, Mr M. must have been tired and already in bed. I went to bed too. I was crushed...

Then this morning, as I opened my mail, I saw the message from the communication person of the company saying that she got my message and they're going to add my application to the contest!!! I was so happy and relieved at the same time. Not so Mr. Murphy. I suppose he was still around as I got the good news. He didn't like the fact that all his effort didn't work out in the end. So he started planning his revenge.

And here is how he did it: As I was about  to rearange the things arround my computer earlier this afternoon,  I kicked a cable accidentally and my brand new 7.0 mp camera fell in my huge cup full of hot coffee! I was speechless... I took it out allmost immediatly, but it was already completely soaked and coffee dripped slowly out of it as I held it in the air. I'll spare you all the other details, you can imagine how I felt. Nothing works anymore. Even my 4 G memory card that I took immediately out doesn't give a sign of life. And I had so many pictures of my projects for this blog on it...
I promise, I'll never mention Mr. M. on any of my posts again.
Share/Save/Bookmark

Monday, November 9, 2009

Indian Carrot-Ginger Soup Recipe

I promised you yesterday the recipe for my favorite Indian Carrot-Ginger Soup. I got this recipe from a German vegetarian cookbook 'Schlemmen ohne Reue' (Indulge without regrets). You can buy it at Amazon but it happens to be on eBay just at this time for only 5 Euro, go for it if you understand German language, it's an excellent book with plenty of colorful, tasty and healthy recipes.


 I modified this recipe slightly in order to keep it simple. So here it goes:
Indian Carrot Ginger Soup
Ingredients:
  • 2 tbsp olive oil
  • 1 large onion, finely chopped
  • 2 garlic cloves, finely chopped
  • 1/2 tsp grated fresh ginger
  • 1/2 tsp ground cumin
  • 1/2 tsp ground coriander
  • 1/2 tsp curcuma
  • 1/8 tsp chili pepper
  • 1/8 tsp freshly ground nutmeg
  • 1 lb carrots, chopped in thick slices
  • 5 cups vegetable broth
  • 1/2 tsp grated lemon zest
  • 1/2 cup yogurt (or 1/4 yogurt + 1/4 sour cream)
  • Salt
  • Pepper
Optional: Freshly chopped coriander leaves and sour cream for garnish
Preparation:
  • Heat oil in a large saucepan over medium heat. Add garlic and onion and stir often until soft, about 5 min. Meanwhile, peel carrots and slice them into 3/4-inch- (2 cm) thick rounds. Grate ginger in a separate little bowl, add all the spices. Add ginger with spices to onion mixture and stir again to warm the spices trough. Add carrots, vegetable broth and lemon zest. Bring to a boil, cover and reduce heat to medium-low. Let simmer for 20 minutes, stirring occasionally, until vegetables are tender.
  • Add yogurt and puree the soup with a hand blender, scraping down inside of bowl as needed. At this point, don't let the soup boil, let it simmer at low heat, add pepper and salt. I usually cut some coriander leaves with scissors and add to the soup, not too much, you don't want to overpower beautiful spices. The soup is ready to serve, you can swirl a little sour cream on top and add a coriander leaf, if you like.
This soup will keep well, covered and refrigerated, at least 5 days or freeze up to 1 month.
You got to admit that a colorful bowl of silky-smooth velvety carrot soup sets the mood for a nice autumn or winter dinner. Enjoy!
Share/Save/Bookmark

Sunday, November 8, 2009

Cookbook Holder Solution

Today, as I was cooking my beloved Indian Carrot and Ginger soup, I used my improvised and simple cookbook holder. Actually, this isn't really a cookbook holder, it's rather a solution in the absence of it. There are so many models to find today, some even aren't so expensive, like this one I like :

Sleek and simple, only 14,99$ from http://www.organizeit-online.com/
But as it turns out, I have other priorities so I prefer this 1$ solution at the moment. I would like to say that I came up with it, but it wouldn't be true. I must have seen this one on the Internet very long time ago. So here it is working for me in my ugly kitchen:

All you need is a pants holder with clips! Works like a charm with not so thick cookbooks, individual pages / cards and magazines:


Simple to use, easy for storage. BTW, the recipe for my soup is from this German cookbook I love.
Just pay attention as you buy the pants holder: the clips should be rubber coated from the inside to prevent slipping. That's all! Oh, and the recipe for the soup, I'll give it to you tomorrow.
I found on the Internet some other very interesting ideas using the pants holder. I would like to share with you this one that Jean and Dylan from Ladies & Gentlemen Home posted last year as a beautiful solution for displaying art:
 
Be sure to visit their blog on ladiesandgentlemenhome.blogspot.com

Share/Save/Bookmark

Friday, November 6, 2009

Lovely November morning (for DIY post)

As I was preparing  my coffee this morning I couldn't help but wonder: is it possible to have such a long beautiful autumn, sunny and temperate even in November?  So I grabbed my camera and took a picture of my kitchen window bathing in the morning sun, with African violets still blooming.

So, and now back to work! I wanted to share with you an idea for reusing, or recycling, an unusual object. For quite some time now, i had in my shed an old utensil basket from my old dishwasher. It was in good shape and I stored some little things in it. Then, last weekend, as I was cooking in my all but practical and ergonomic kitchen, I reached for the olive oil bottle so clumsily that several bottles with oils, vinegars and sauces started moving very quickly, and in the same time, in the direction of my head. I must have used some cool move at that moment because somehow I managed, after wrestling with diverse bottles for several seconds, to save them from falling. On my head. I was furious at my kitchen even if it was entirely MY FAULT. And here is why: when we bought our fist home over 4 years ago, I didn't like the existing kitchen at all. Not one bit. But we bought the house because it had some nice features for our two teenagers and that was very important at the time. And even if I dreamed all my life of having a nice kitchen and hoped to get it with our first house, I said to myself: OK, calm  down, you can function in it for a while, see what is wrong with it and renovate later. And I did it. Except renovating, that part isn't done yet, I'm still in the dreaming phase because of  'peanuts'. And you should know: I really love cooking for my family, love making them happy when the smell of their favorite meal starts to spread from the kitchen and they come running to see when it'll be ready. Back to reality, there is not one day that I don't hate my kitchen, it is so small and very badly organized space wise. And the list goes on, it's very long, believe me. I'll save it for another post dedicated to my kitchen. See?! There is no stopping me when I start talking kitchen. Anyway, back to my DIY. Having survived the accident with my oil bottles, I started to think of a rapid solution for them. What you don't know: all these bottles were placed in the cupboard over my old integrated oven. And no, there was no other solution for them at the time. Last week, as I was finalizing some prewinter rearranging in my shed with my DH, I saw my old dishwasher basket and the light went on! Back in the house, I put my bottles in it - perfect! So I took some very simple loop screws and fixed it on the inside of the cabinet door beneath my stove without having to change it a bit. And without using any tools. Ta-da!!! Look at this smart, simple, free, practical, ecological, green solution:

This basket has a grip in the middle, very practical for cooking outside in the summer. Just grab and go, everything is ready. Here are some more pictures:

Share/Save/Bookmark
Related Posts Plugin for WordPress, Blogger...